Inventory Control
Inventory Control is a mobile inventory management application designed to speed up and simplify basic operations with store orders. It's perfectly suitable for shops and smaller stores.
It follows a similar logic to the BarCodeCommand panel from within the Desktop Client, but much simpler. It allows workers to complete their daily tasks quickly, without going through the more complex procedures of the WMS Worker.
You can receive, issue, reconcile, transfer and scrap orders in just a few steps. These actions are not synchronized in real-time with the ERP.net system - you need to create the respective receipt transaction, issue transaction, transfer order, and reconciliation documents in order to reflect them.
Prerequisites
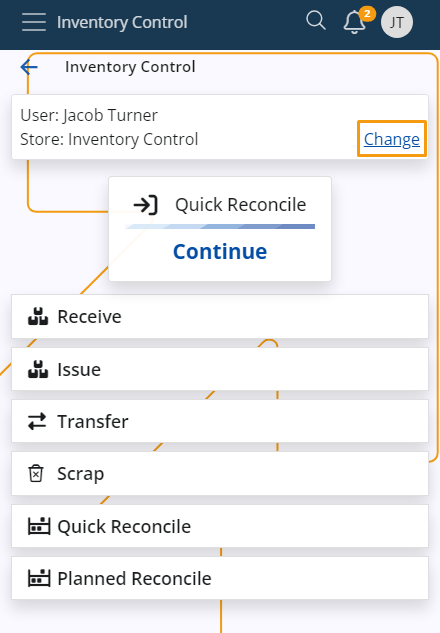
Before you start using Inventory Control, you'll be prompted to select the store for which you want to perform different operations. That store will be saved for follow-up operations but can easily be switched to a different one with Change button.
Order Display Format
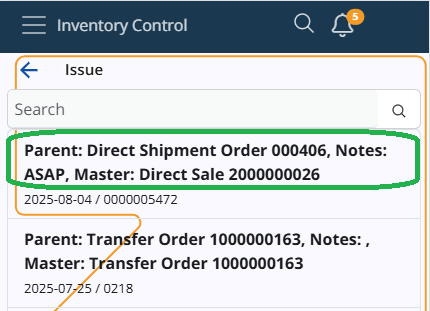
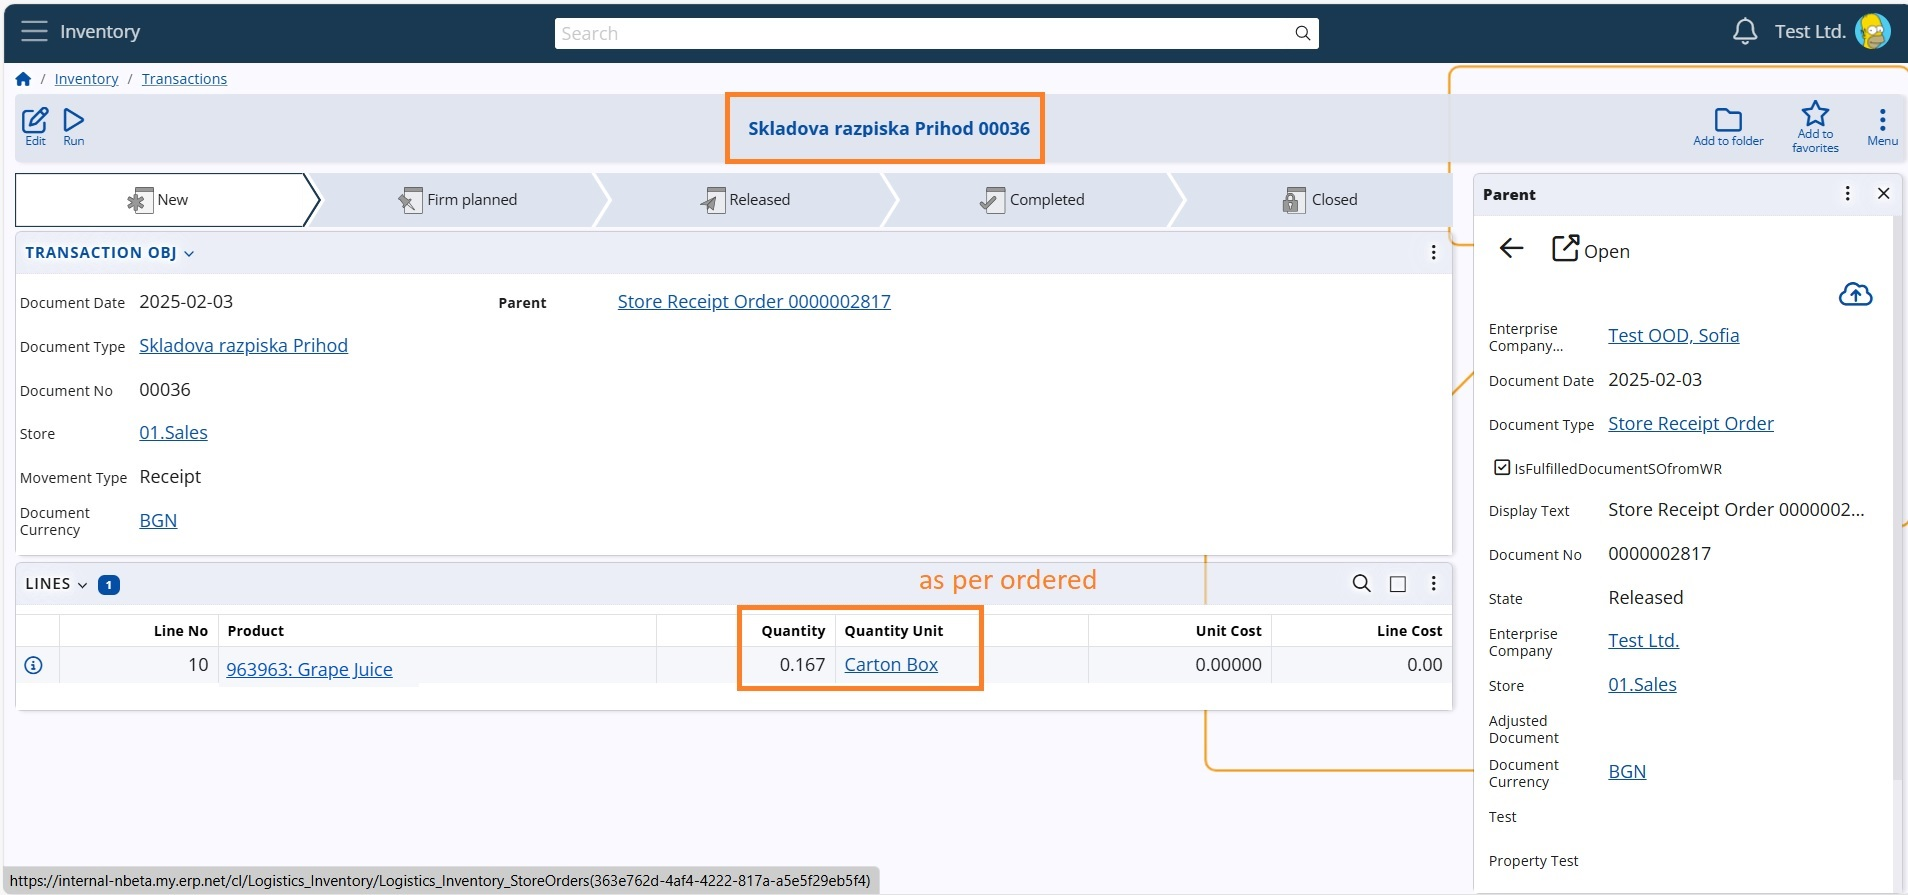
By default, each Store Order in the Inventory Control order list displays the To Party as the first line of information. However, this behavior can be customized through a configuration key.
If the /InventoryControl/OrderDisplayFormat option is defined, the content of the first line will follow the pattern specified in the key’s value. The format is defined using String Interpolation, allowing you to insert placeholders that pull data from the header of the current Store Order — for example: Parent: {Parent}, Notes: {DocumentNotes:T}, Master: {MasterDocument}
This would be displayed like: Parent: Invoice Order 00001, Notes: ASAP, Master: Sales Order 00001
Note
If the configuration key is not defined at all, the system will fall back to the default behavior and display the To Party. If the key exists but has no value, the result will be an empty line (displayed as a dash).
You can include format specifiers and combine multiple fields as needed. You’ll see the configured format applied when browsing orders before starting operations like Receive or Issue. For more details, see the Config Options Reference (option 70).
Working with Inventory Operations
The following sections describe the core functionalities available in the Inventory Control panel. These include product scanning, quantity entry, quick selection, and support for advanced barcode formats — all designed to streamline daily inventory tasks across different types of store operations.
Scanning
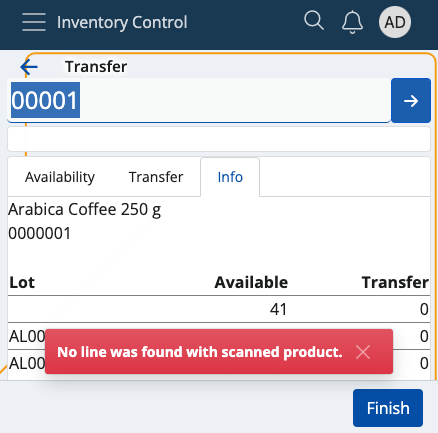
In order to scan your products manually, you need to use the Scan field. It lets you quickly insert the instances of a product you want to add either manually or through barcode commands. For a list of available barcode templates, check out the Command list.
Individual scan
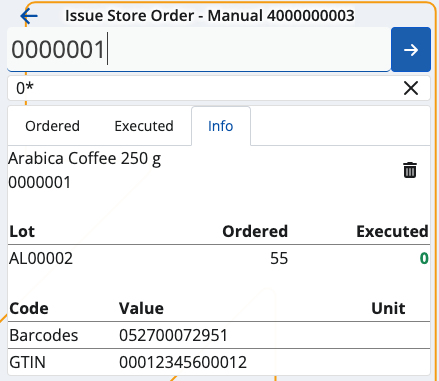
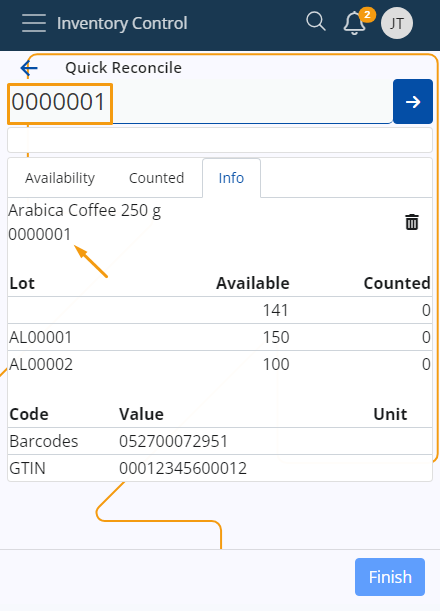
Simply type in a product's code once (e.g. "0000001") in order to add only one pcs of it. Tap the blue arrow to confirm.
![]()
- Every time you scan, you'll be taken to the Info tab for the respective product.
- Successfully scaned pcs are painted in green.
- If more lots are present for a product, the FEFO principle determines which lot has pcs add first.
- Incorrect product codes will generate an error.
Multiple scans
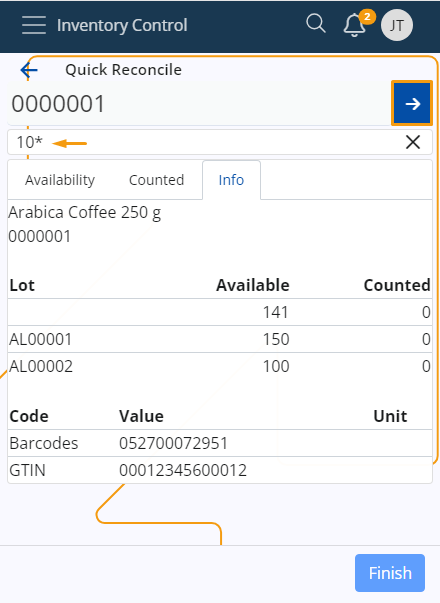
To scan more pcs or the exact number of pcs for a product, specify it first (e.g. "50"), add a "", and then enter the product code. This can be done on one line (e.g. 501001150), or on two separate lines for each input. Tap the blue arrow to confirm.
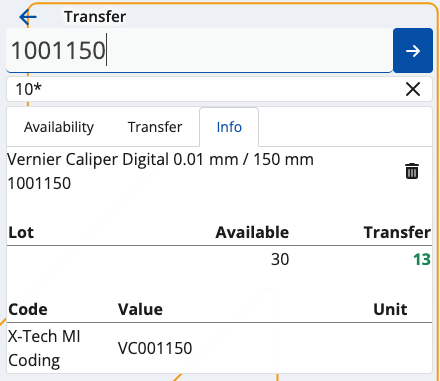
- The trash bin button allows you to remove the latest operation, which will restore the previous operation value.
- Any one, two or three-number combination is automatically counted as a multiplier. You can insert it without adding "*" in the end.
- You can remove inserted multipliers by tapping the Clear button (X).
Zero count
If you enter a zero quantity in the Scan field, all of the entered quantities before will be set to zero.
Note
Entering a zero count behaves differently depending on the operation type and should be interpreted within the specific context of each process.
Select a product from the Info tab
You also have the option to enter a product's code only by tapping on its code within the Info tab.
When you do that, the product code will be automatically entered in the Scan field.
If you need to scan multiple quantities of your product, you can provide a quantity into the Scan field.
Once you tap on the product's code, you can enter all of the quantities at once.
Scan a GS1
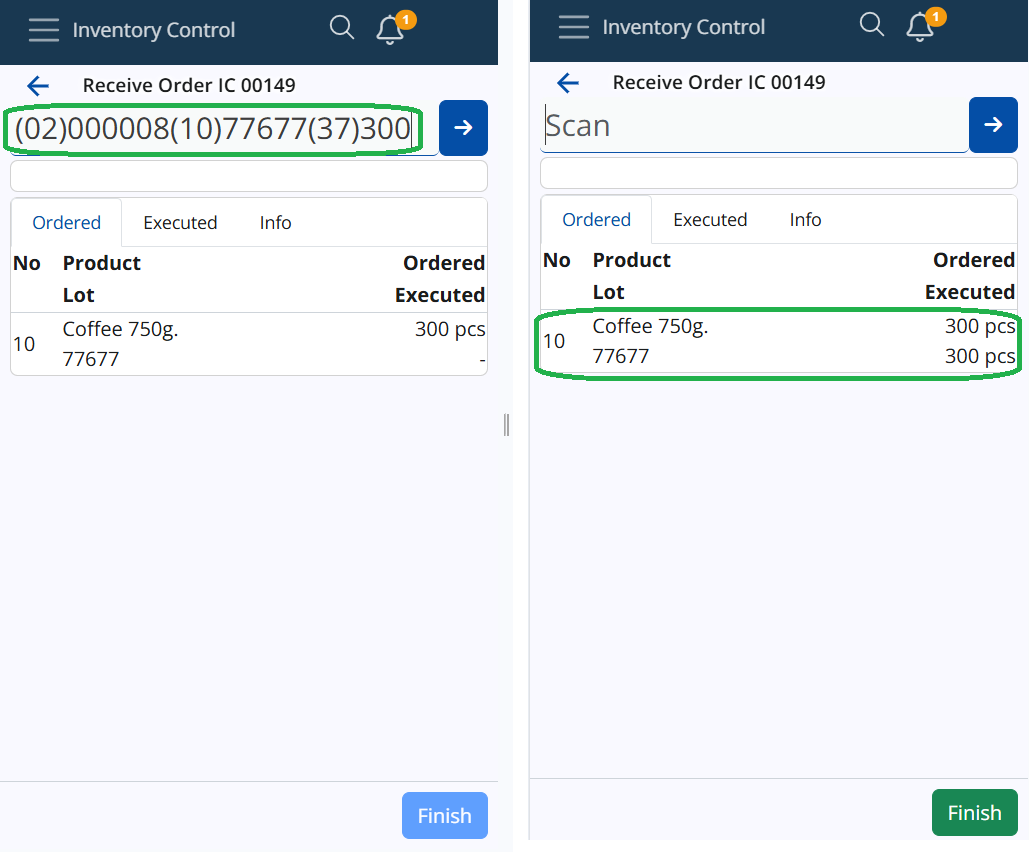
Inventory Control also supports GS1 Barcodes and recognizes a number of GS1 application identifiers.
GS1 barcodes are a type of barcode used in retail and supply chain operations to identify items. They are used in many countries and are based on the international GS1 standard. These barcodes use a list of different application identifiers (AI) to encode additional data into the barcode such as quantity, lot, expiration date, serial number, and other attributes.
Inventory Control works with some of the most popular GS1 identifiers to recognize the product and the additional information that comes with it and is also encoded into the barcode.
A list of the identifiers that are recognized:
| Identifier | Description | Length |
|---|---|---|
| (01) | Global Trade Item Number (GTIN) | 14 |
| (02) | Global Trade Item Number (GTIN) of contained trade items | 14 |
| (10) | Lot number | variable, up to 20 |
| (21) | Serial number | variable, up to 20 |
| (37) | Count of trade items | variable, up to 8 |
Once triggered, it tries to break the GS1 barcode into separate parts to extract the information encoded in it. If there are no errors during this operation, it starts looking for an appropriate line that can be executed with the recognized information. When it finds the best matching line, it starts its execution. If the information is enough to fulfill the line, then the system will not ask the user for anything and will automatically execute the line. If there is no matching line – it throws an error message and stops the execution.
For example, if there is a Store Order line that contains a product with Part Number 000008, a specific lot 77677, and a quantity of 300 pcs and you scan the following barcode (02)000008(10)77677(37)300, this line will be automatically fulfilled.
Note
The identifier (21) Serial Number is also recognized, but for now, it's just saved in the memory of the IC application.
Measurement unit of the order
The store order can be created using different measurement units for the "Quantity Unit" field, even for the same product. These units could include kg, packet, carton box, liter, pcs, bulk, bottle, and more. To ease the process for users, the "Choose Measurement Unit" menu is available within the order. Its main purpose is to make the order execution more user-friendly and help streamline the counting of various storage and distribution units.
How it works?
The menu is available for operations Receive and Issue. It offers a choice, known as the measurement unit used for order visualization. The settings are remembered per user and independently for the forementioned operations.
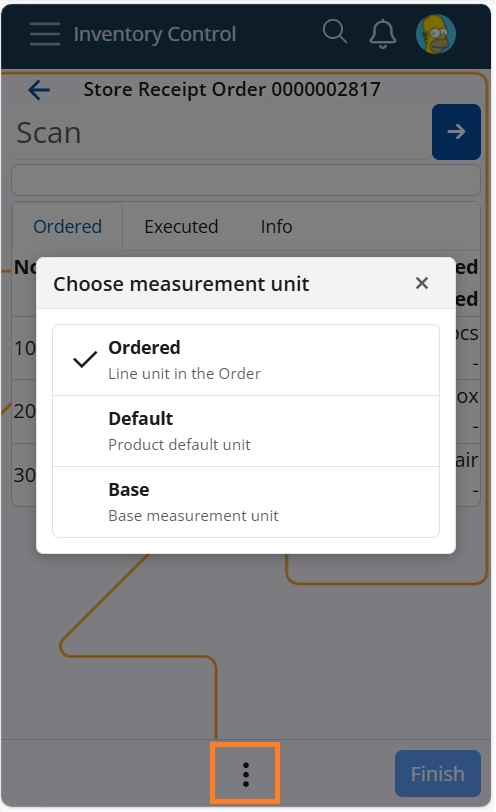
A user initiates a Receive operation for an Order. By default, the order lines are displayed in the ordered measurement units unless changed. In the example below, a Receive order includes three lines for products ordered in different measurement units.
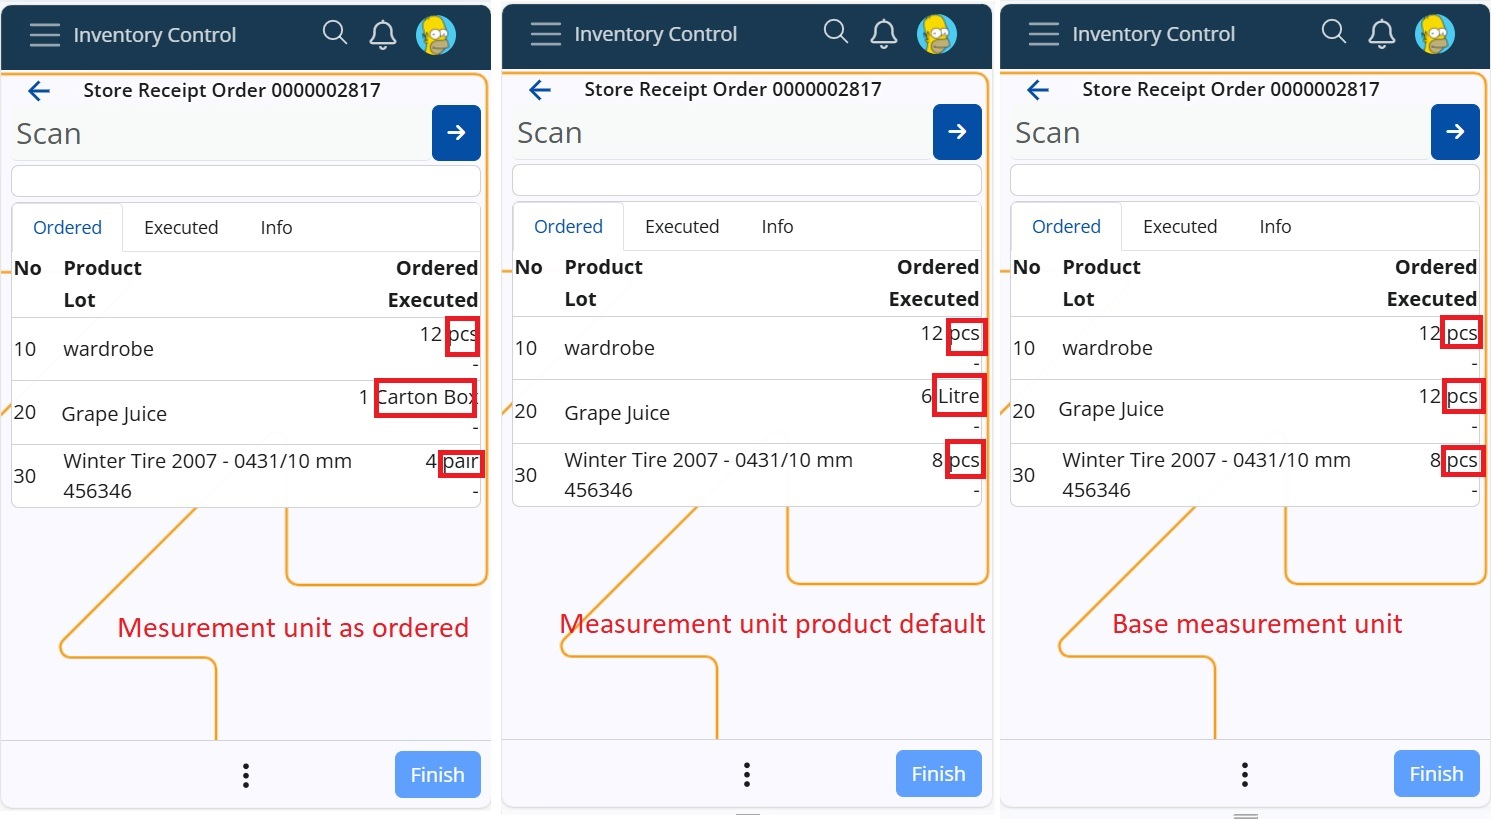
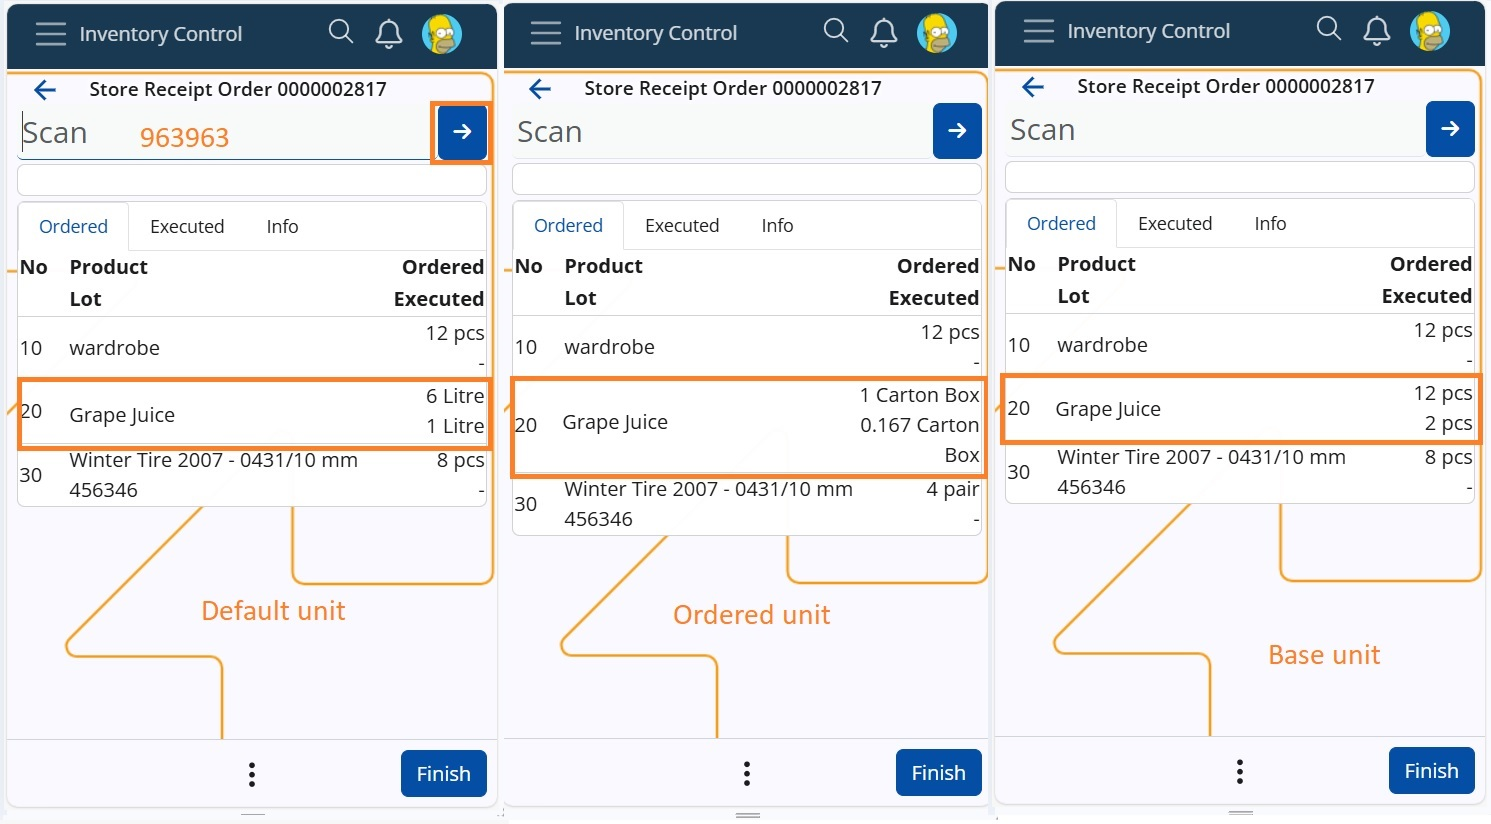
Product "Grape Juice" has a default measurement unit of "Litre" but is currently ordered in "Carton box." The conversion is as follows: 1 Carton box = 6 Litres = 12 pcs (Base unit).
When scanning 1 unit of "Grape Juice" (code: 963963), the system correctly recalculates the quantity using the ratio relative to the base measurement unit. This results in a recorded quantity of 1/6 of a Carton box (0.167) or 2 pcs (Base unit).
Note
The product code is permanently associated with the product's default measurement unit. This means that when you scan the product code, the system automatically identifies its default measurement unit and recalculates the quantity based on the selected visualization unit.
By changing the display measurement unit through the menu, the ordered quantities are recalculated based on the product dimensions and predefined conversion ratios.
During order execution, users can switch between measurement units for convenience.
Upon order completion, the Store transaction is recorded in the originally ordered measurement units.
With this innovation, workers can scan and process different units of the same product effortlessly, making inventory management more adaptable, efficient, and user-friendly. Try it out today and experience a new level of control over your operations!
How to Use the Bin in Inventory Control
In our Inventory Control module, the bin plays a crucial role in managing product counts. There are two types of bins used in all operations, both available in the Info panel:
- Delete-all Bin (Large Bin) and
- Delete-row Bin (Small Bin)
Using the Delete-all bin
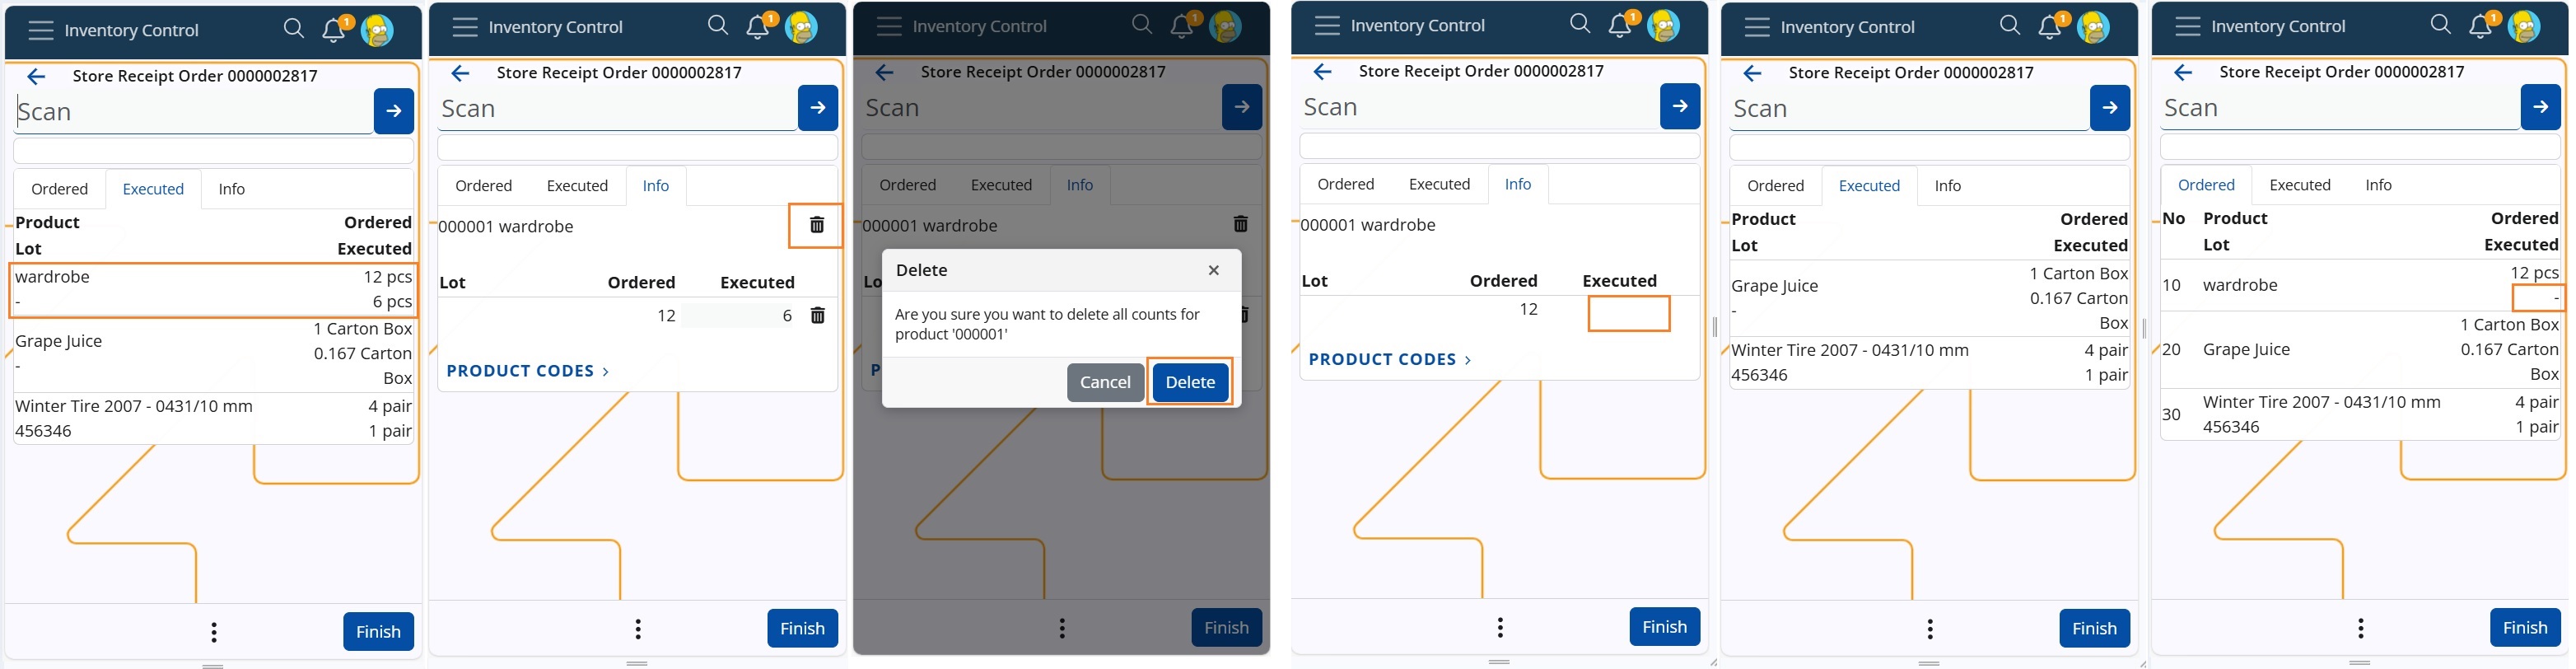
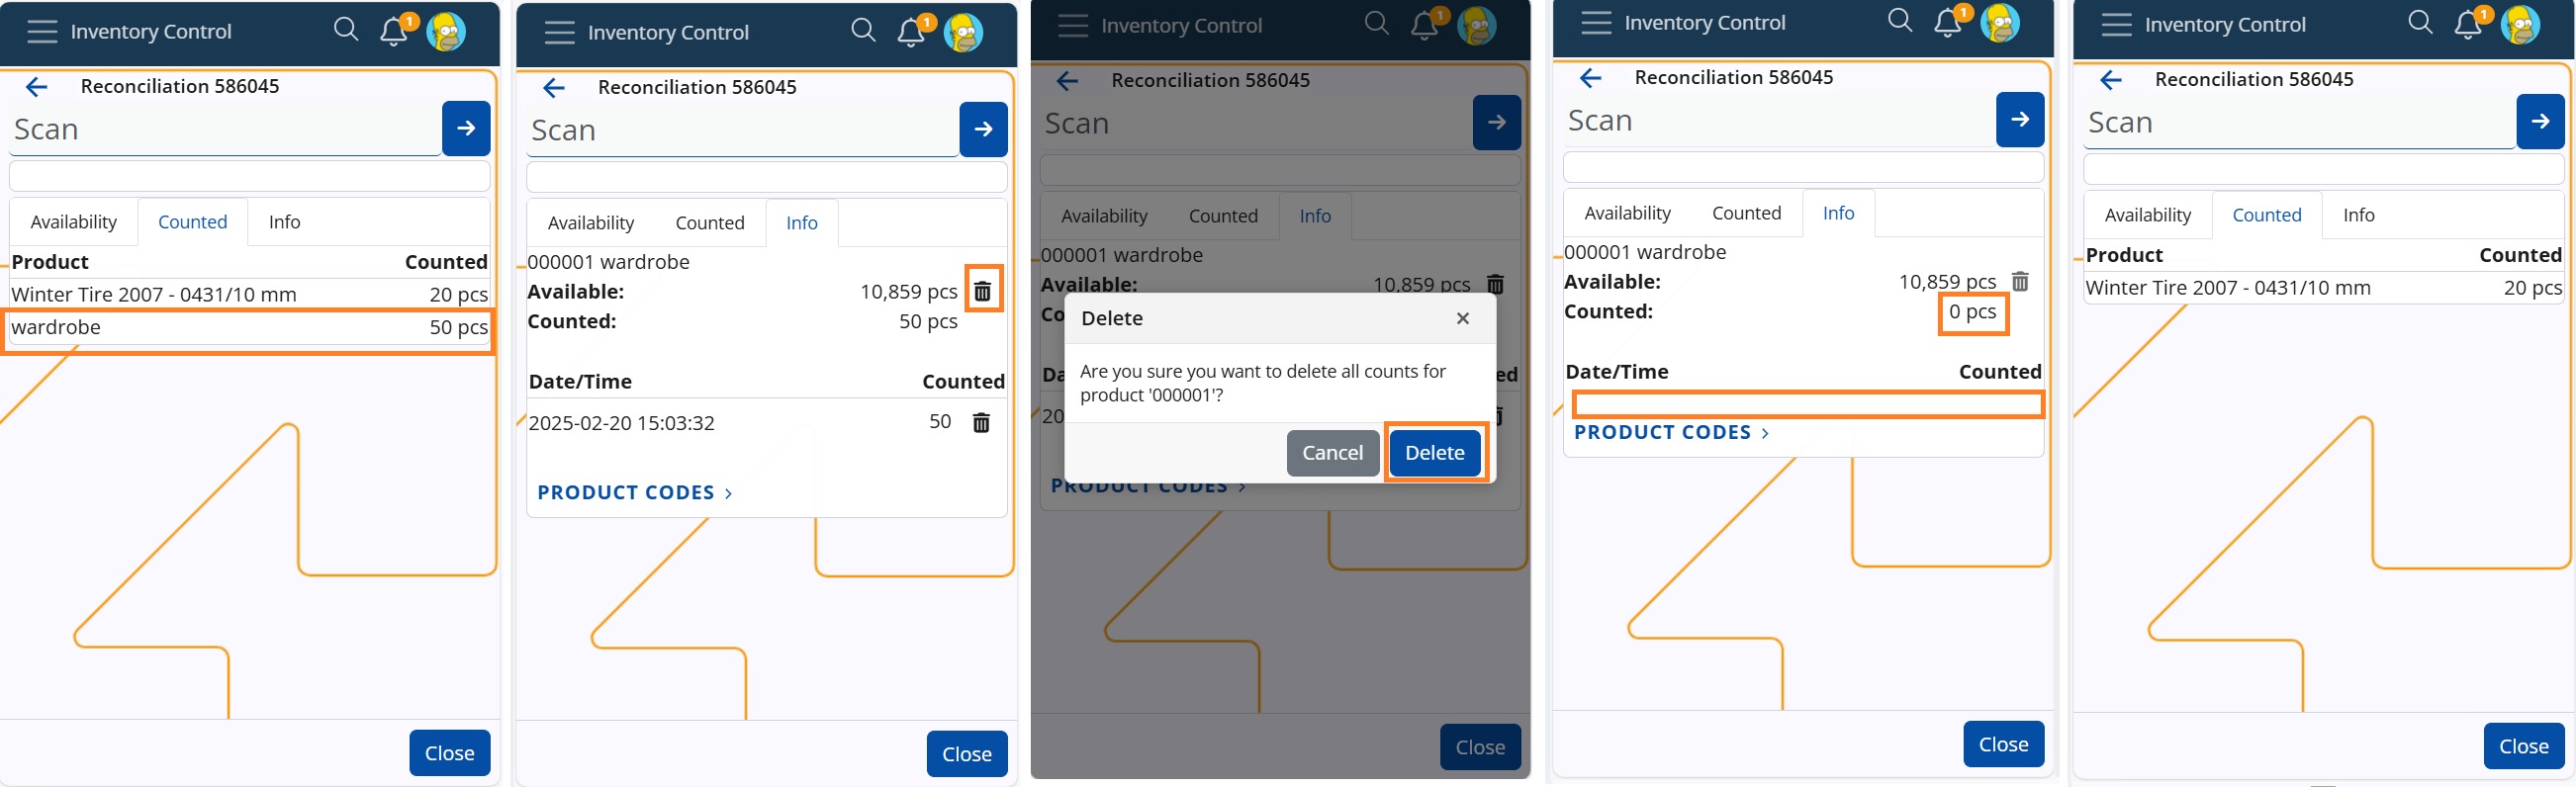
The "large bin" is located at the top, on the product row. It is used to delete all counts and executions for a specific product, marking it as unexecuted or not counted at all. The process is similar for all operations like Receive, Issue, Scrap, Transfer, Quick reconcile and Planned reconcile.
Steps:
Let say you execute a Receive operation of an Order consisting of three lines - products X, Y and Z. Each line has been executed as seen in tab Executed and in Executed field. You decide to delete all executed quantities for product X:
- Navigate to the Info tab of product X.
- Locate the large bin at the top of the product row.
- Click on the bin icon -> A pop-up message appears to confirm deletion.
- Choose Delete to confirm.
Result:
- The quantity for product X in the Executed field is deleted
- The row related to this product in tab Executed is removed.
- After deletion, it appears as if the product was never executed.
Another example at operation Planned Reconcile, in which you count 50pcs of product X and 20pcs of product Y. In field Counted is entered the quantity for each product and in tab Counted are registered the rows for the counted products. You decide to delete all counts for product X. Execute the forementioned steps (1-4). As a result all counted quantity for product X is deleted as if never counted. If you check the records in panel Counts in Reconciliation document, you will see that the line is also removed from there.
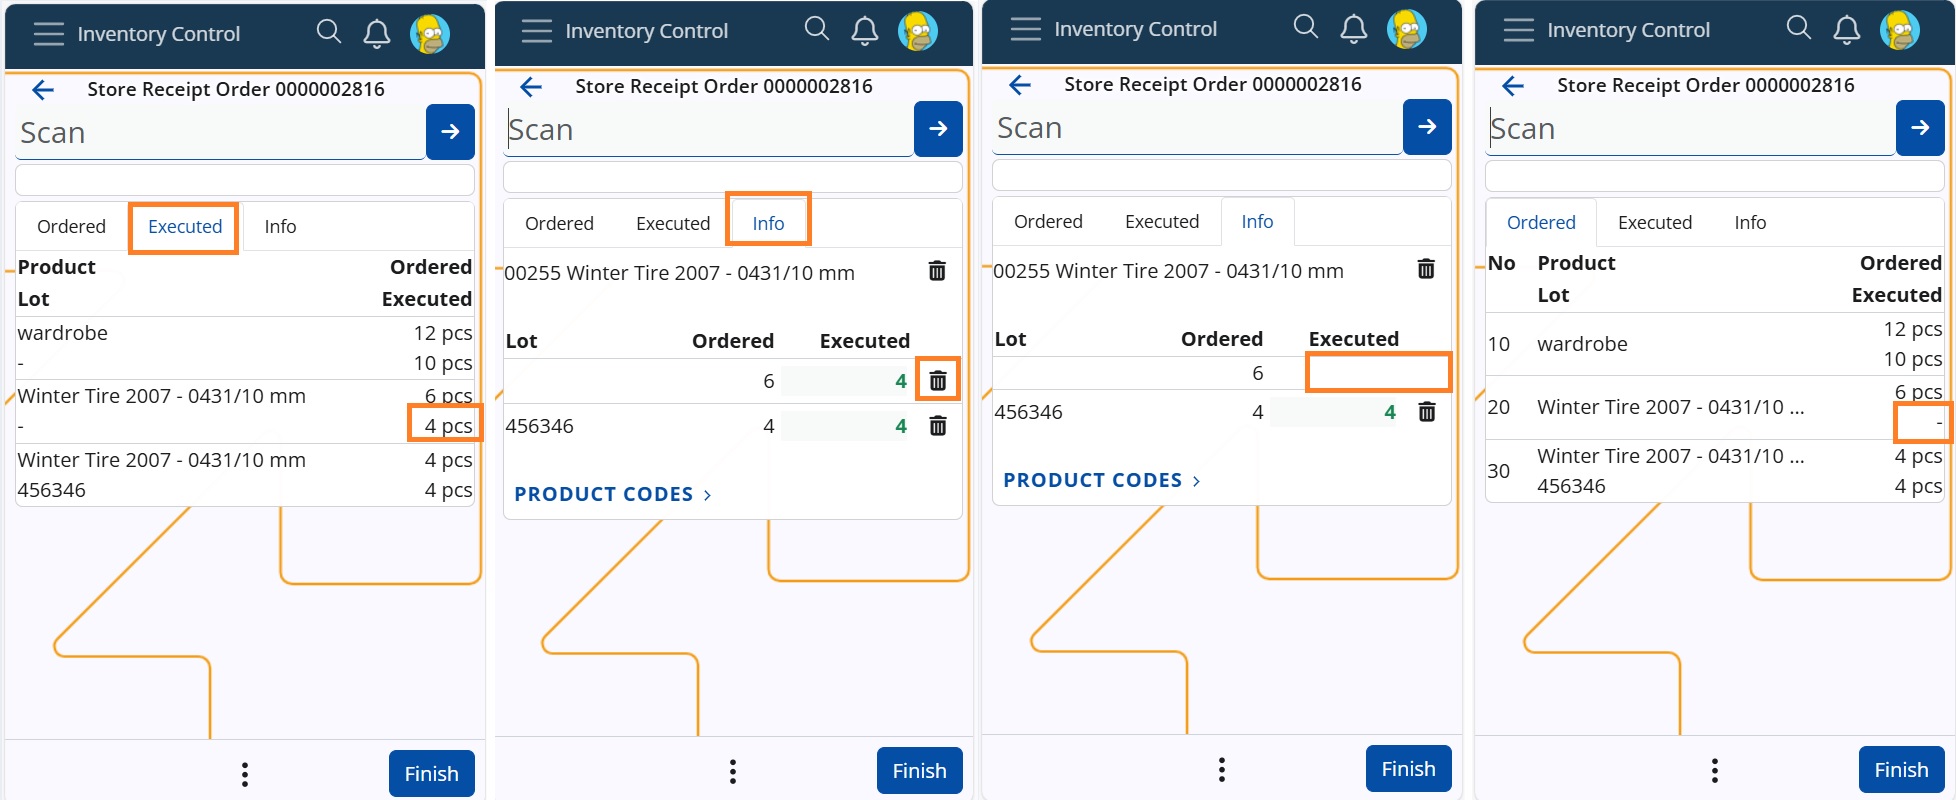
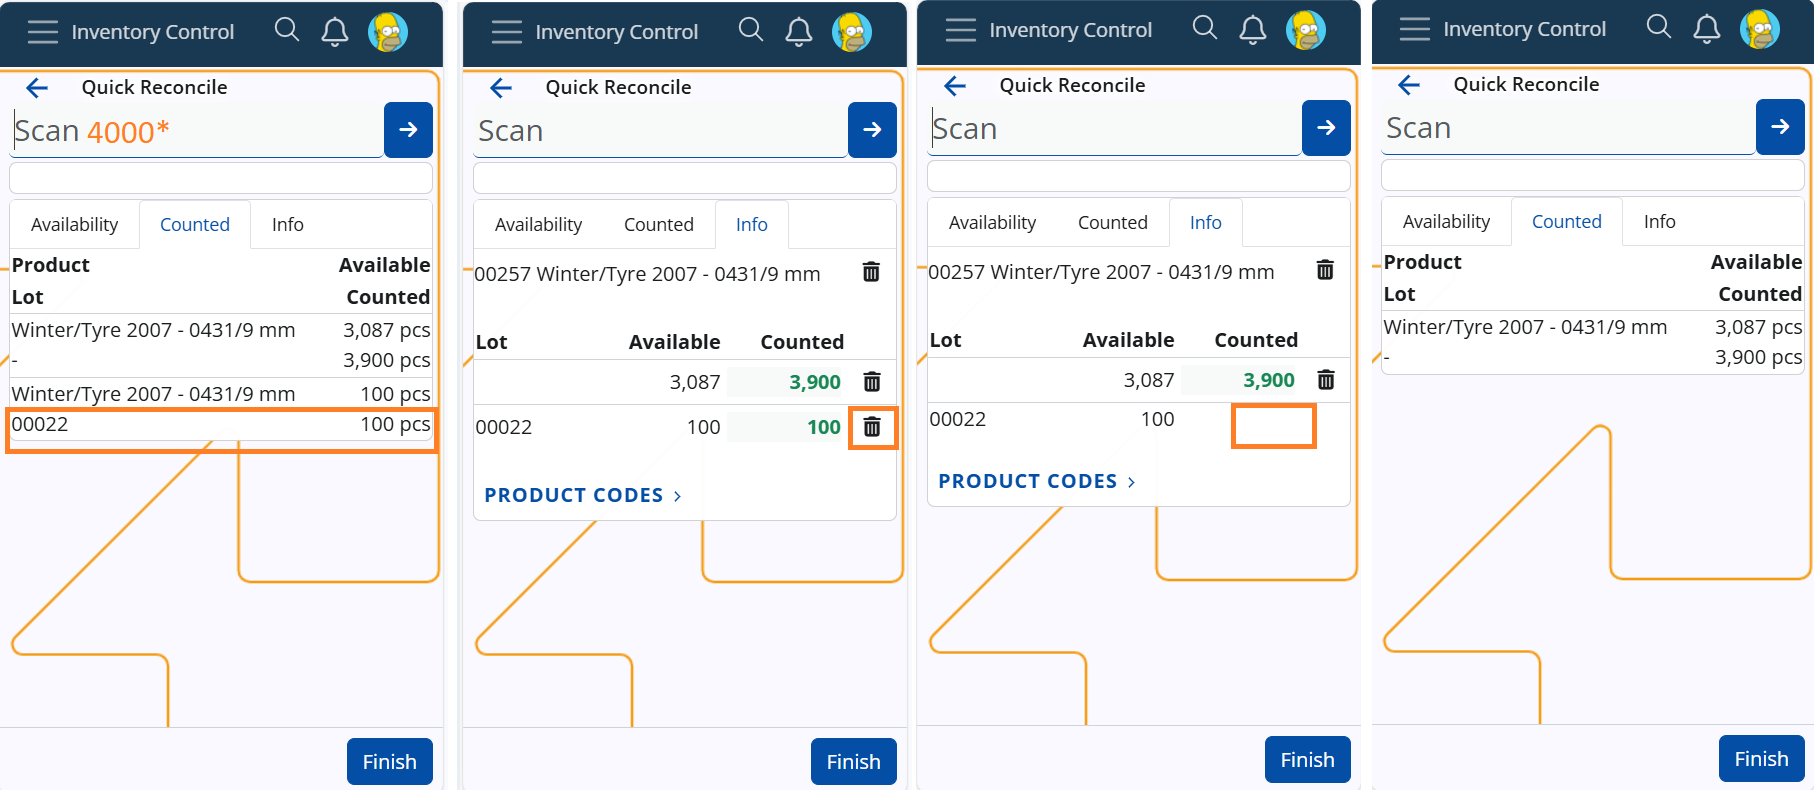
Using the Delete-row bin
The "small" bin is used to delete individual product count rows at all IC operations. It is helpful with products having lots or variants, allowing users to delete distributed quantities for specific lots or variants. For example, if a scanned quantity is spread across multiple lots, users can now remove the count for a chosen lot without affecting others.
Steps:
Let say you execute a Receive operation of an Order consisting of three lines, for two products X and Y, and product Y is ordered in a lot as well. Execution of 8pcs of product Y results in distribution of the quantity between the unspecified product lot (4pcs) and the specified lot (4pcs). Now each line has been executed as seen in tab Executed and in Executed field. You decide to delete the quantity of the unspecified lot of product Y:
- Navigate to the Info tab of product Y;
- Locate the small bin on the row, next to the desired qunatity ("4");
- Click on the bin icon.
Warning
No confirmation message for the deletion will pop-up!
Result:
- The quantity for the unspecified lot of product Y in the Executed field is deleted.
- The row related to this product and lot in tab Executed shows a dash "-".
- After deletion, it appears as if the lot was never executed.
Another example at operation Quick Reconcile, and you count 4000pcs of product X. The amount is distributed between the available lots. You decide to delete the counted quantity of the specified lot ("00022"). Simply click on the bin in the row of the lot, next to quantity "100" and without any warning, it will be deleted. The row in tab Counted will also be deleted.
By using these bin functionalities effectively, you can ensure accurate inventory management while maintaining flexibility in operations.
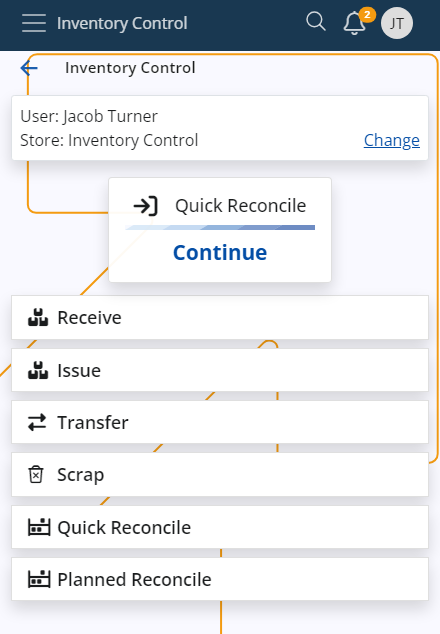
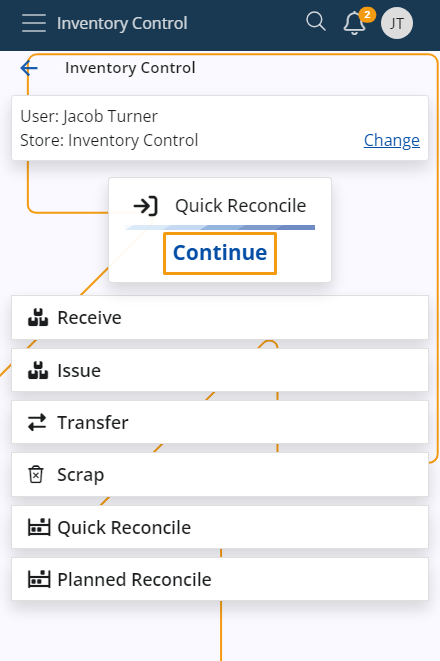
Continue last started operation
Inventory Control allows you to resume the last operation you were performing.
If you exited a receive operation mid-way, for example, it will be displayed as a shortcut in the main menu.
You can tap the Continue button to proceed with it.
If you choose to begin a new operation before completing the latest one, a warning will appear, asking you to confirm the termination of the latest operation.
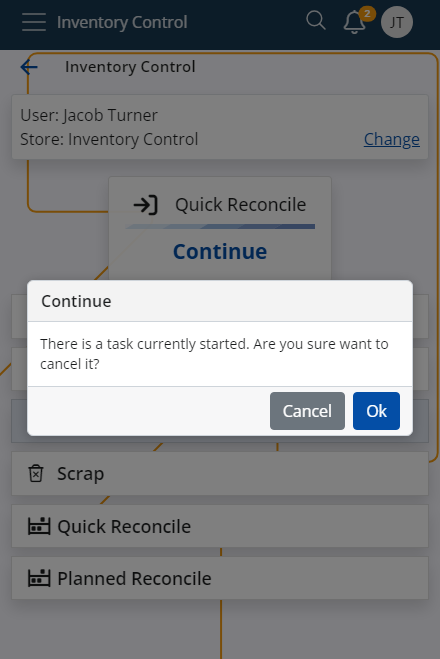
Note
If in the middle of the execution you decide to change Language, Company or Location from the User menu, you will be taken to the initial IC screen with no progress saved.
Learn more about Inventory Control in the following articles: