Setup Warehouse Manager View
Overview
The Warehouse Manager View in ERP.net provides warehouse supervisors with a unified interface to monitor and control warehouse operations.
This view facilitates the entire fulfillment process — from reviewing incoming requisitions to monitoring execution, managing follow-ups, and assigning new orders.
The view guides the manager through the full execution flow — from monitoring fulfillment progress and confirming requisitions, to initiating follow-up orders and reassigning new tasks.
Interface Composition
The view is structured in two parts:
1. Main Navigator (Left Panel)
Displays a list of Warehouse Orders with enhanced color-coded status visualization.
Calculated Attributes
The navigator includes several example calculated attributes configured to demonstrate typical scenarios:
- By Progress:
- Green – Completed
- Yellow – Released
- Red – Completed with issues
- Gray – Not Started
- By Direction:
- Shows the logistical flow direction based on a calculated attribute

These are just examples provided for convenience. Users can define and apply their own calculated attributes according to their operational needs. The visual effect for the progress attribute is achieved through Expression Format Conditions applied in the navigator.
You can see how By Progress attributes are created here: Execution Status for Warehouse Orders
You can see how the By Direction attribute is created here: Requisition Type
2. Web Panels (Right Panel)
There are four Web View panels, configured to load documents in Single Record form via dynamic URLs.
Three of them are automatically synchronized with the selection in the navigator on the left — when a Warehouse Order is selected, each panel displays information related to that specific order.
The fourth panel embeds the same navigator again and is used for assigning orders directly from within the view.
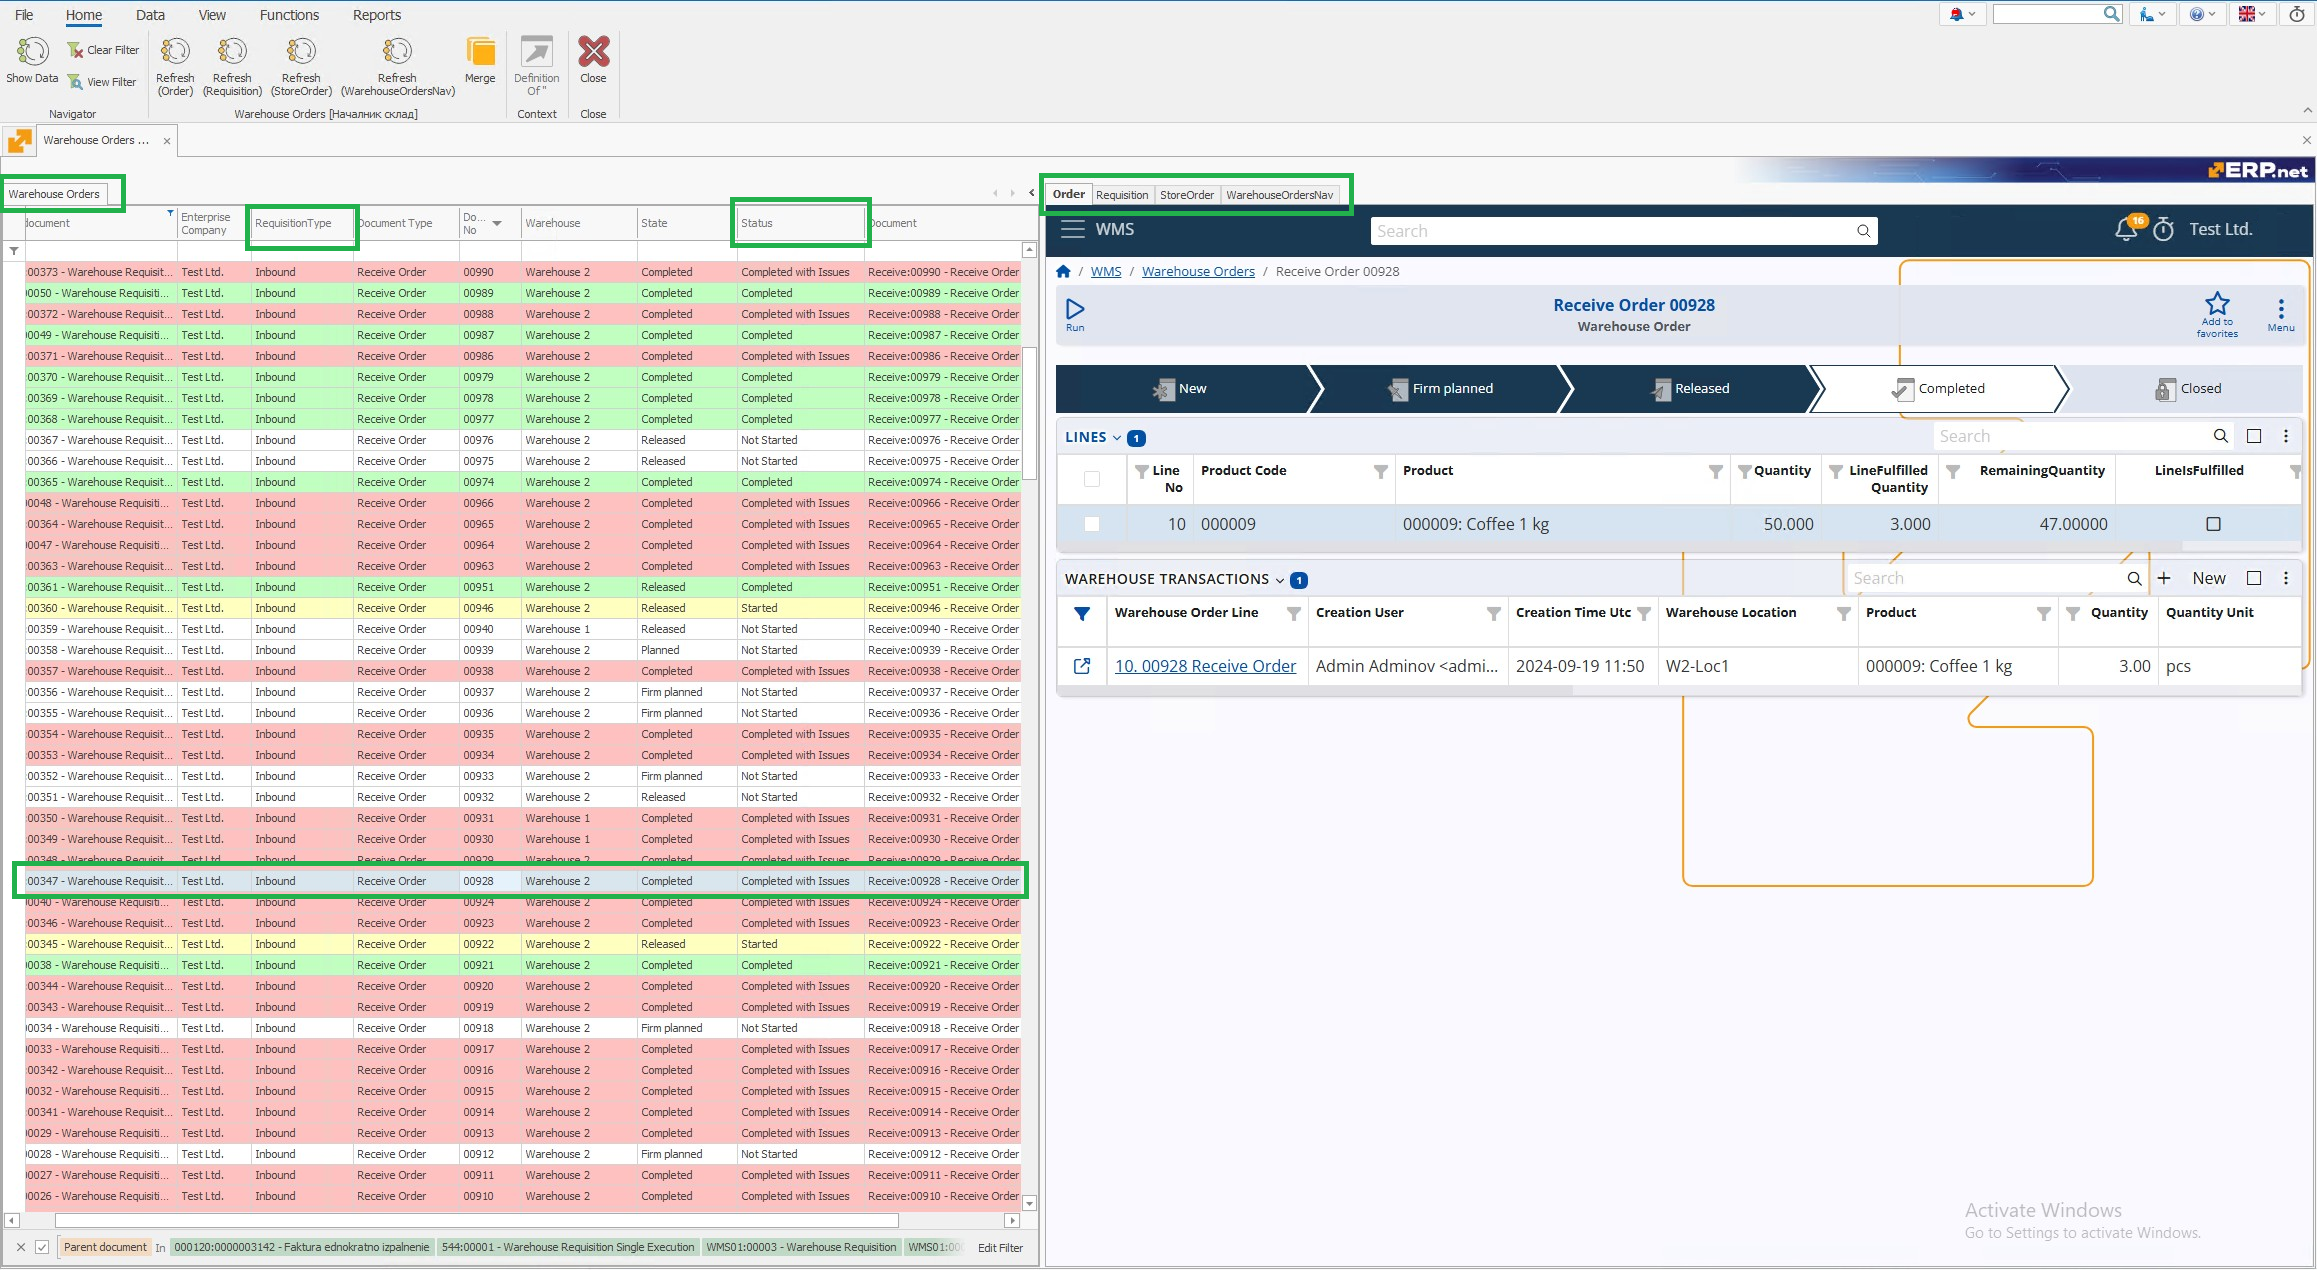
Web Panel 1: Warehouse Order Details
This panel displays the Single Record Form of the Warehouse Order selected in the navigator on the left.
It provides a complete operational view of the order — allowing warehouse managers to track what has been ordered, how much has been fulfilled, and how execution is progressing.
The Lines section includes all key information about the ordered items, such as product, quantity, unit of measure, and other essential system fields.

In addition to the standard data, the following calculated attributes are shown to highlight execution progress:
- Fulfilled Quantity
- Remaining Quantity
- Fulfillment Status
You can see how Fulfilled Quantity and Remaining Quantity are created here: Executed and Remaining Quantities for Warehouse Order Lines
You can see how Fulfillment Status is created here: Execution Status for Warehouse Orders - CA #LineIsFulfilled
The Transactions section shows:
- User who executed the operation
- Timestamp of execution
- Line-level details (product, quantity, location, lot, serial numbers, etc.)
Functional Highlights
- The order is marked as Completed automatically when the warehouse worker finishes it through the handheld device.
- The warehouse manager can then see the updated status here and proceed to the next steps using the following panels.
Setup
In Change View mode, enter the following in the field Source URL (with placeholders):
https://<instance>.my.erp.net/cl/forms/Logistics_Wms_WarehouseOrders({Id})
You can also customize the panel’s name using the Panel title field.
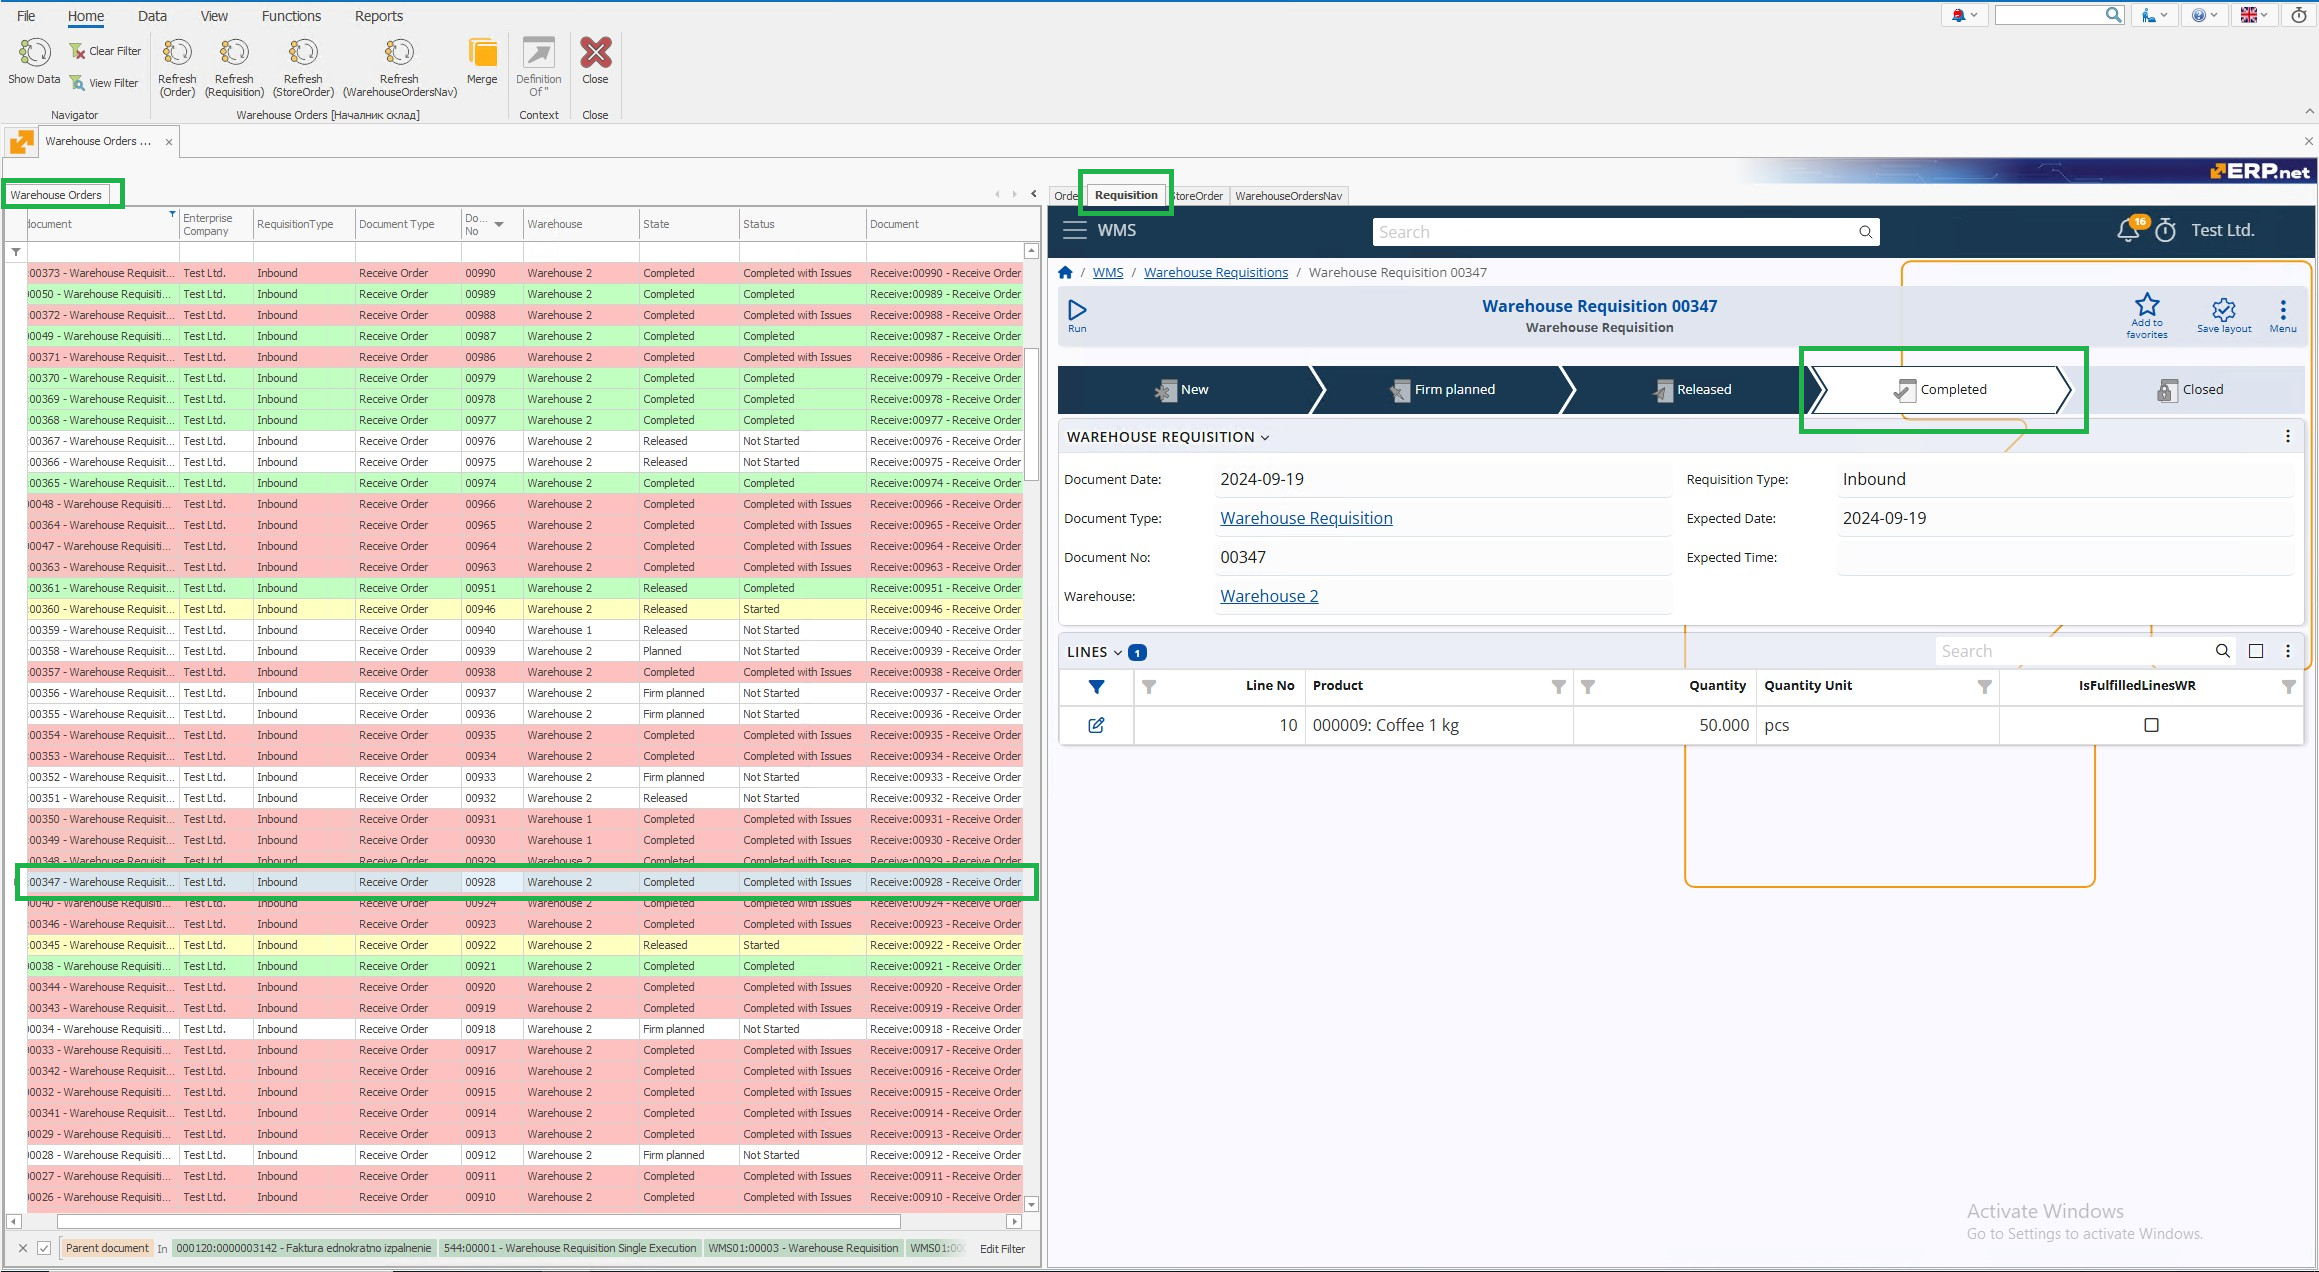
Web Panel 2: Requisition (Parent Document)
This panel displays the Single Record Form of the Warehouse Requisition that is the parent document of the selected Warehouse Order.
When the requisition is marked as Completed, the corresponding Store Transaction is automatically created based on a document event configured in the Store Order - Completed Warehouse Requisition.

Functional Highlights
- Depending on whether the order was fulfilled in full or requires further execution, the manager can choose to proceed to the next panel — either to initiate a follow-up or to verify that everything is complete.
Setup
In Change View mode, enter the following in the field Source URL (with placeholders):
https://<instance>.my.erp.net/cl/forms/Logistics_Wms_WarehouseRequisitions({Parent.Id})
You can also customize the panel’s name using the Panel title field.
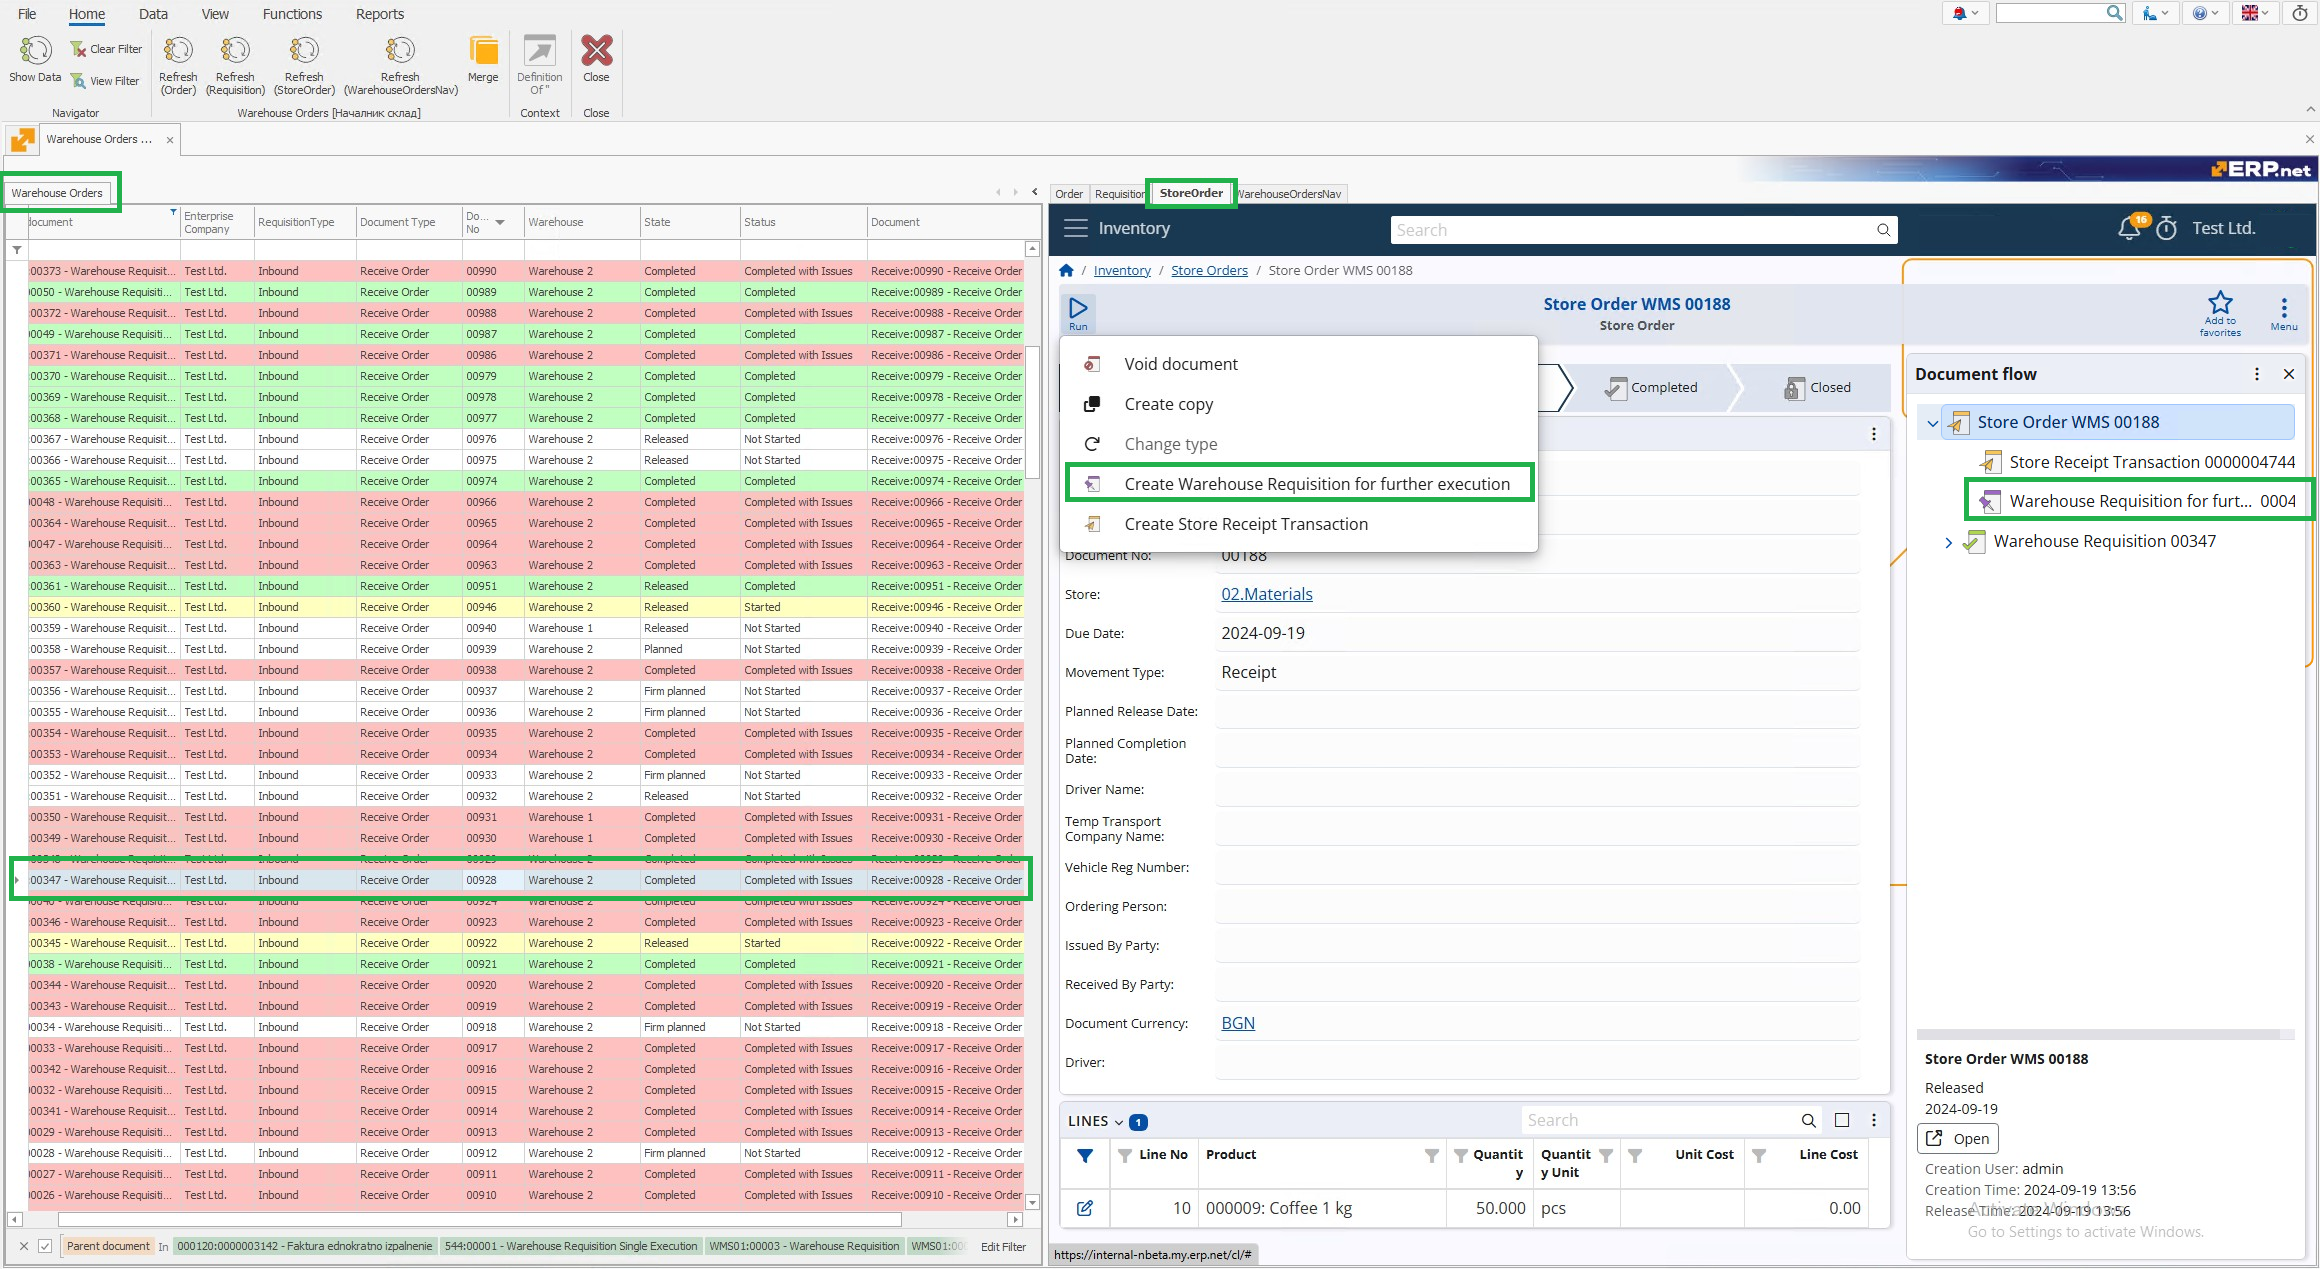
Web Panel 3: Store Order (Grandparent Document)
This panel displays the Single Record Form of the Store Order, which is the grandparent document of the selected Warehouse Order.
It is used to review the source document that generated the requisition.
If some lines remain unfulfilled, the manager can create a follow-up Store Order from here.
This action starts a new execution cycle by generating a new requisition and Warehouse Order, which will then appear in Panel 1 and Panel 4 for further processing.

Use the UI Functions button to create a Requisition for Further Execution.
Select the document type for the new requisition from those allowed in the Document Route.
This action starts a new execution cycle for the newly created requisition.
Setup
In Change View mode, enter the following in the field Source URL (with placeholders):
https://<instance>.my.erp.net/cl/forms/Logistics_Inventory_StoreOrders({Parent.Parent.Id})
You can also customize the panel’s name using the Panel title field.
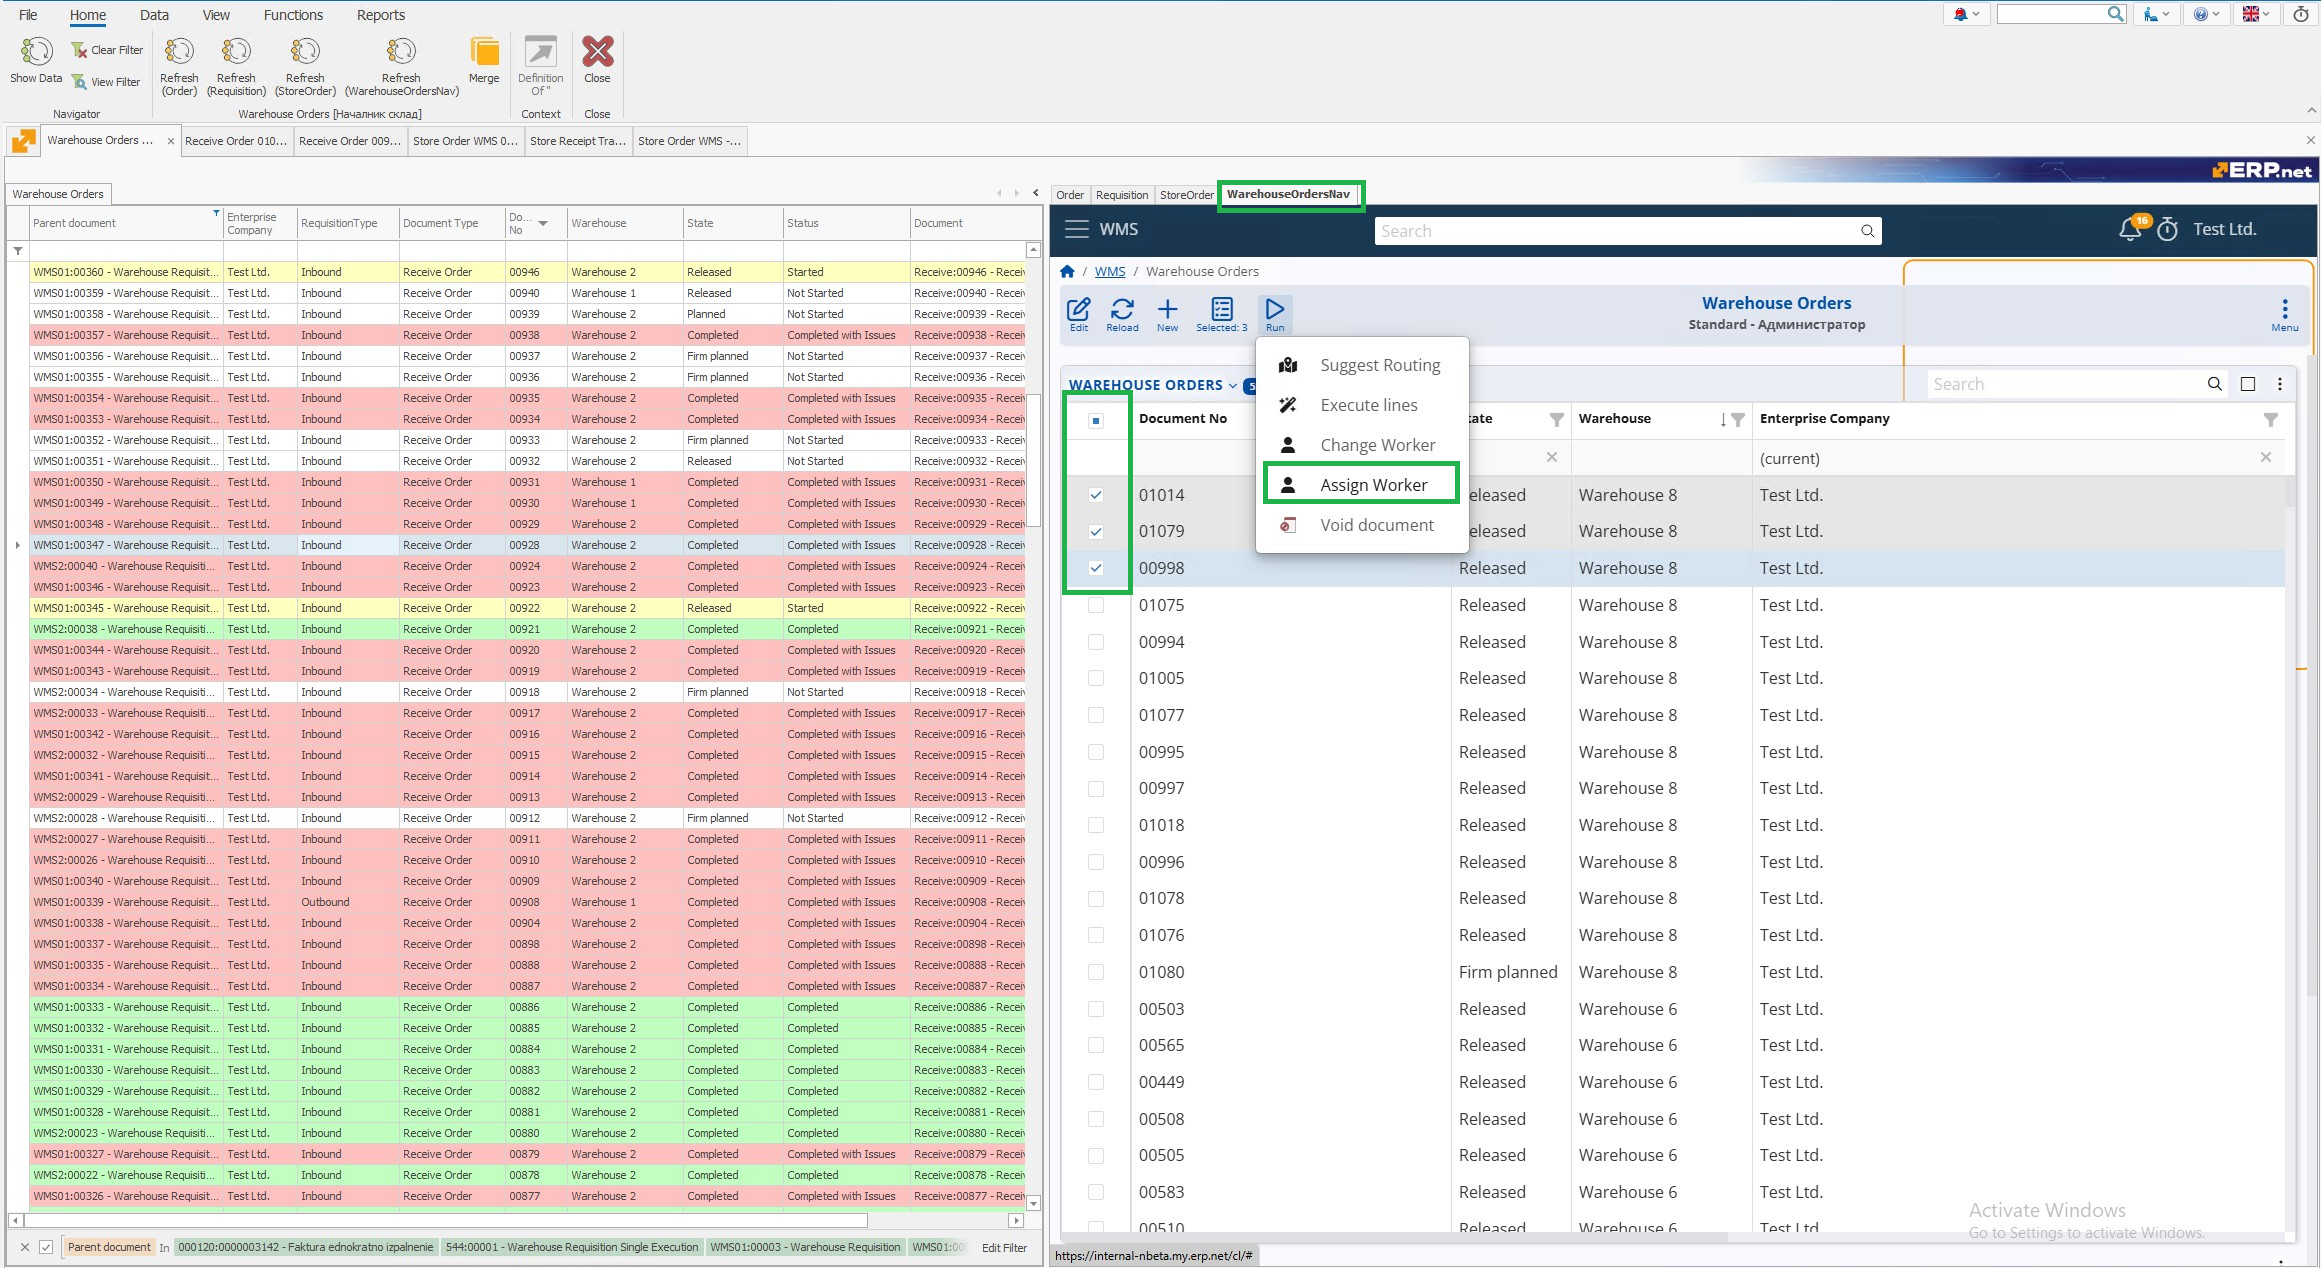
Web Panel 4: Warehouse Orders Navigator
This panel embeds the Warehouse Orders navigator again, making it possible to manage multiple orders at once using group operations.

Functional Highlights
- Assign selected orders to a specific worker using the UI function Assign Worker
- Change the performer of already assigned orders via Change Worker UI function
Setup
In Change View mode, enter the following in the field Source URL (with placeholders):
https://<instance>.my.erp.net/cl/forms/Logistics_Wms_WarehouseOrders
You can also customize the panel’s name using the Panel title field.
Note
Use the Change View mode to customize or replicate this layout for other operational views.
The instance name in the Web Panel URLs must match the name of your specific ERP tenant instance.